Welcome, budding Onion Doctors! Ready to transform tiny onion seedlings into plump, flavorful bulbs? This comprehensive guide on how to transplant onion seedlings is packed with expert tips, fun insights, and practical steps to ensure a bountiful harvest. Whether you’re a beginner or a seasoned gardener, this guide will make transplanting onions a breeze. Let’s get those hands dirty and grow some onions that’ll make any chef weep with joy!
BENEFITS OF TRANSPLANTING ONION SEEDLING:
- Higher Yields and Better Bulb Quality – Transplants establish faster and grow uniformly, leading to larger, healthier onions.
- Reduced Disease and Pest Pressure – Starting in a nursery minimizes exposure to soil-borne diseases and early pest attacks.
- Improved Germination and Survival Rates – Controlled nursery conditions result in more consistent and successful seedling development.
- Better Spacing and Field Management – Transplanting allows for accurate plant spacing, which improves airflow and reduces competition.
- Flexible Timing and Planting – You can raise seedlings while preparing the field, ensuring better crop scheduling and adaptability.
- Minimized Transplant Shock – Hardening off seedlings before planting helps them adjust to outdoor conditions, reducing stress after transplanting.
WHY TRANSPLANTING ONION SEEDLINGS:
Transplanting onion seedlings gives your plants a head start, allowing them to develop strong roots and robust bulbs. Onions are a kitchen essential, and starting with seedlings ensures better control over their growth, leading to a bigger, tastier yield. This guide covers every step to help you master onion planting with confidence.
STEP 1: TIMING YOUR TRANSPLANT PERFECTLY:
Timing is everything when it comes to transplanting onion seedlings. Onions are crops, so you’ll need to plan based on your local climate.
- When to Transplant: Aim for early spring (March–April) or late summer for fall harvests. Soil temperatures should be cool.
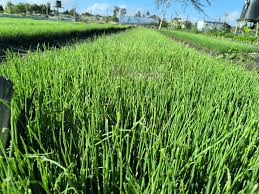
- Seedling Readiness: Seedlings should be 6–8 weeks old, about 6 inches tall, and as thick as a pencil lead.
- Frost Consideration: Transplant 2–4 weeks before the last expected frost for spring planting. Check your local frost dates for precision.
Pro Tip: Use a planting calendar tailored to your region to nail the timing. Onions thrive in cool, crisp conditions!
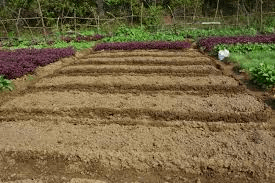
STEP 2: PREPARE A COZY GARDEN BED:
A well-prepared garden bed is the secret to healthy onion growth. Onions love loose, fertile, and well-draining soil.
- Pick the Perfect Spot:
- Choose a location with 6–8 hours of direct sunlight daily.
- Avoid areas where water pools, as onions hate soggy roots.
- Soil Prep:
- Loosen soil to a depth of 12–15 inches using a garden fork or tiller.
- Mix in well-rotted compost or aged manure to boost fertility.
- Test soil pH (aim for 6.0–6.8). Add lime to raise pH or sulfur to lower it.
- Feed the Soil:
- Apply a balanced fertilizer (e.g., 10-10-10) or an organic nitrogen-rich option like blood meal.
- Onions are hungry plants, so give them a nutrient-packed home.
STEP 3: HARDEN OFF YOUR SEEDLINGS:
Before moving your seedlings outdoors, they need to toughen up through hardening off. This 7–10 day process helps them adjust to the elements and prevents transplant shock.
- Gradual Exposure:
- Days 1–2: Place seedlings in a sheltered spot for 1–2 hours of indirect sunlight.
- Days 3–5: Increase to 3–4 hours, gradually introducing direct sunlight.
- Days 6–10: Extend to 6–8 hours, including exposure to wind and cooler nights.
- Watering During Hardening:
- Keep soil moist but not waterlogged.
- Shield seedlings from heavy rain or strong winds.
STEP 4: TRANSPLANT LIKE A PRO:
Now for the fun part—transplanting your onion seedlings into their forever home! Follow these steps for success:
- Pre-Water Seedlings:
- Water seedlings an hour before transplanting to ease root stress.
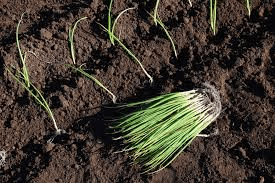
- Dig Planting Holes:
- Space holes 4–6 inches apart in rows 12–18 inches apart. For green onions, space closer (2–3 inches).
- Dig holes 1–2 inches deep, just enough to cover the roots.
- Plant with Care:
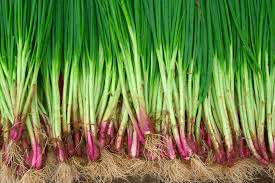
- Gently separate seedlings, keeping roots intact.
- Place each seedling in a hole, with the white base just below the soil surface.
- Press soil lightly around the roots to secure them.
- Water Immediately:
- Give the bed a gentle soak to settle the soil and help roots settle in.
STEP 5: NURTURE YOUR ONIONS FOR GREATNESS:
Your onion seedlings need consistent care to grow into juicy bulbs. Here’s how to keep them thriving:
- Watering:
- Provide 1 inch of water per week, keeping soil moist but not soggy.
- Reduce watering as bulbs mature to avoid rot.
- Weeding:
- Pull weeds regularly, as onions don’t like competition.
- Weed gently to avoid disturbing shallow onion roots.
- Mulching:
- Apply a 2–3 inch layer of straw or grass clippings to retain moisture and suppress weeds.
- Keep mulch away from onion stems to prevent rot.
- Fertilizing:
- Feed every 2–3 weeks with a nitrogen-rich fertilizer until bulbs start forming (when tops yellow).
- Switch to a low-nitrogen fertilizer to encourage bulb growth.
Fun Fact: Onions signal harvest time by letting their tops fall over naturally—like a grand finale bow!
STEP 6: SOLVE COMMON ONION PROBLEMS:
Even the best Onion Doctors face challenges. Here’s how to tackle common issues:
- Yellowing Leaves: May indicate overwatering or nutrient deficiency. Check soil moisture and fertilize if needed.
- Pests: Watch for onion maggots or thrips. Use row covers or neem oil to keep them at bay.
- Bolting (Flowering): Caused by stress like temperature swings. Harvest bolted onions early, as they won’t store well.
STEP 7: HARVEST YOUR ONION BOUNTY:
After 90–120 days, depending on the variety, your onions will be ready to harvest! Here’s how to do it right:
- Signs of Maturity: Tops turn yellow and fall over naturally.
- Harvest Method:
- Loosen soil around bulbs with a garden fork.
- Gently pull onions and brush off excess soil.
- Curing:
- Lay onions in a single layer in a dry, well-ventilated area for 2–3 weeks until necks are dry and skins are papery.
- Store in a cool, dry place for months of use.
YOUR JOURNEY AS AN ONION DOCTOR:
Congratulations, Onion Doctor! By following this step-by-step guide to transplanting onion seedlings, you’re well on your way to a thriving onion patch. From preparing the perfect bed to harvesting plump bulbs, you’ve got the skills to grow onions like a pro. Share your progress in the comments, and let’s celebrate your onion-growing victories together! Happy planting, and may your onions be ever flavorful!
Contact us for: Onion seedlings, Garlic seedlings, Germinated garlic cloves, Farm planning services, Soil testing, training on onion and garlic growing, Drip irrigation installation and maintenance, Agronomic support, Onion and Garlic value pack and Farm management. For free consultation, placing orders or booking a visit with an agronomist, please contact us via Call or what’s app +254703982228, Email: Info@oniondoctor.co.ke. You can also check out our social media handles for daily updates on TikTok: https://www.tiktok.com/@oniondoctorke?_t=ZM-8wmsTu0qumO&_r=1 Instagram: https://www.instagram.com/oniondoctorke?igsh=MTVoaHF3aWUydTJzaQ==Facebook:https://www.facebook.com/share/16SwgYn2dG/ Youtube:https://youtube.com/@oniondoctorke?si=u5Jnd-r0qU9UDYqL and Twitter: https://x.com/OnionDoctorKe?t=FR3JXlS_oN1vjjUgAtfyzg&s=09.